-1.png?height=120&name=Polyprint%20Logo%20(Dark)-1.png)
A detailed guide on how to overcome ink flow problems and get your printer up and running for a seamless production.
TexJet shortee2 ink flow system
First of all, in order to approach ink flow related problems, you must have all the information on how the ink flow system operates. This means, you need to know the parts it consists of and purpose of each part. So, lets break down how the ink flow system works:
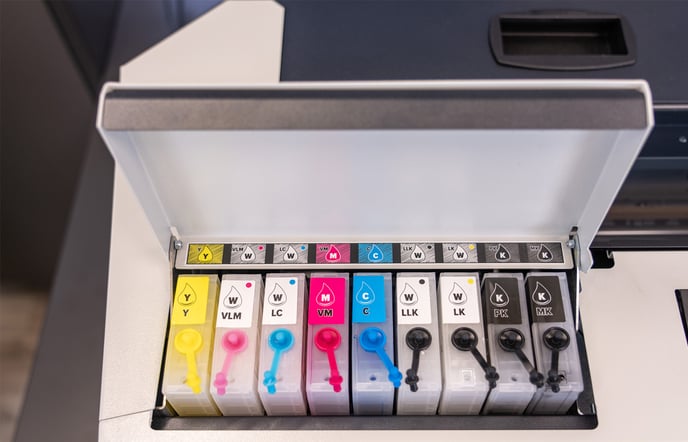 There is only one type of ink cartridge that can be installed on a TexJet shortee2 printer, the user-refillable cartridge. These can be refilled multiple times with bulk ink. These cartridges do not work with pressure, but actually the other way around. As the ink cartridges are above the printhead level, a decompressor pump is used to stabilize the ink flow, in order to avoid ink dripping. This is why, it’s very important to have the air tap open at all times. In shortee2 cartridges, the ink isn’t pushed into the tubing system but is pulled out instead.
When the ink has filled the entire ink flow route, it ends up at the dampers’ assembly that is positioned on top of the printhead. The dampers are then connected with the printhead channels and that is how the ink flows all the way into the nozzles.
The capping station is where the printhead “rests” after printing. When the printhead is locked at the cap, the nozzle plate is sealed airtight at the capping station. This way, the nozzles are kept protected. During cleanings, the cap pulls ink from the head surface and through the capping station tubes the ink ends up at the waste tank.
How to efficiently resolve ink flow related issues
STEP 1. Regulate the environmental conditions
 DTG printers preferably operate at room temperature (10- 30°C) and between 30-70% humidity levels. Ideally, at 20°C and 55% humidity. Operating the printer in inappropriate conditions can cause a change in the consistency of the inks and eventually, may end up blocking the ink flow system leading to possibly clogged printhead nozzles. To avoid possible ink flow issues, due to ambient conditions, you can always check the temperature of your workspace and regulate your humidity levels by using a humidifier.
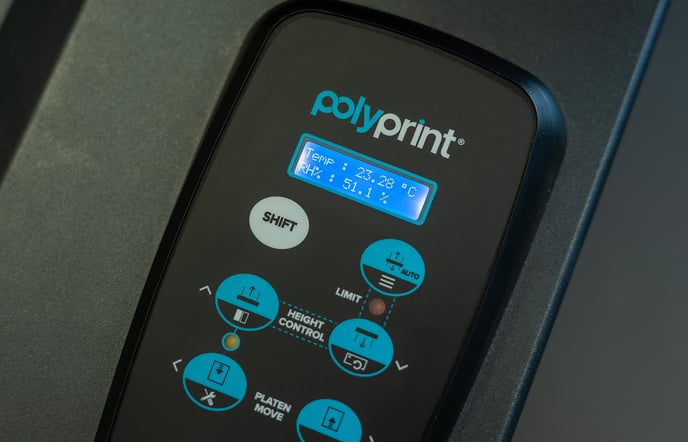
Note: TexJet shortee2 is equipped with special sensors that monitor the environmental conditions of your workspace and alert you to changes that may affect your results. The humidity levels and the temperature are always displayed in the Platen Control Panel once the printer is opened. You will also see them in pop-up messages, when the sensors detect an unwanted change, different from the recommended values.
STEP 2. Maintain properly the capping station, wiper & printhead
Make sure that you correctly perform the daily and monthly maintenance routine. If the maintenance hasn’t performed properly on those parts, it means that dried ink and fibers will be gathered. Regarding the capping station, if its rubber surroundings are not cleaned correctly, the ink build-up can cause an inaccurate sealing of the printhead and thus, resulting in nozzle dryness. The wiper should also be cleaned daily after printing, as it is responsible for wiping the bottom of the printhead, during production to keep the printhead clean. The printhead bottom can gather fibers and dried ink, risking nozzle blockage. Hence, you must carefully clean its surroundings every day after your production with a swab.
TexJet shortee2: Daily maintenance guide
TexJet shortee2: Monthly maintenance guide
Caution: During printer maintenance the printhead must NOT be unlocked for more than 5 min.
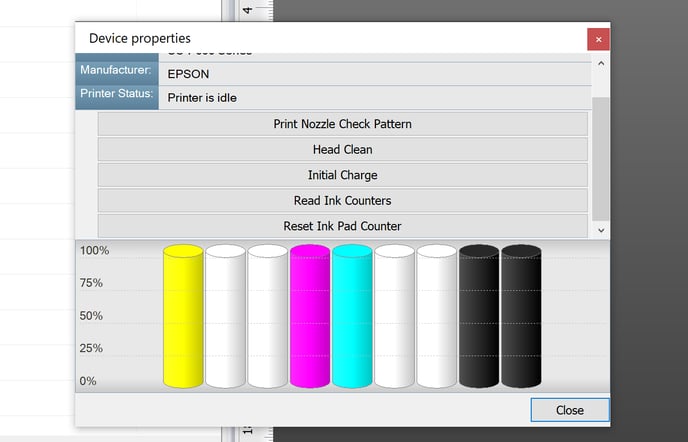 If you have performed the maintenance procedures, according to the instructions, and are still having trouble getting a proper nozzle check, remove your ink cartridges out and with a syringe, pull ink from their filter. Load the cartridges again and perform an Initial Charge through the RIP software. If there is still evident nozzle loss, apply some cleaning solution and lock the printhead on the capping station for at least 10 min, in order for it to soak. Then, perform a Head Cleaning and check the nozzle condition.
For a more severe clogging phenomenon, you can try applying some Isopropyl Alcohol (IPA) to the capping station and leave it maximum for 10 minutes. Then, perform a Head Cleaning from the Printhead Control Panel and a Nozzle Check to see the condition of the nozzles. Don’t leave the IPA for a longer time, as the rubber surroundings of the capping station are sensitive, and can cause their degradation.
Warning: Don’t proceed with further cleanings if the problem has not been fixed. A number of cleanings can result in negative pressure on the printhead if done multiple times.
STEP 3. Perform correctly the Auto height adjustment
Sometimes, if you use a garment with a lot of fibers they may rise up during printing, especially in an environment with increased humidity. These fibers can reach the printhead bottom and cause nozzle issues. This is why it is vital to perform correctly the auto height adjustment feature that all TexJet® dtg printers have. Additionally, you should place your garment correctly at the printer’s platen. Don’t forget to use the adjustable frame system or a fabric glue to make sure that your fabric is kept stable during printing.
Tip: In case of very fibrous fabrics, you can lower the platen to achieve a safe distance from the printhead and opt for Uni-directional printing in order to maintain the printing quality.
STEP 4. Replace the ink cartridges and check the ink batch numbers
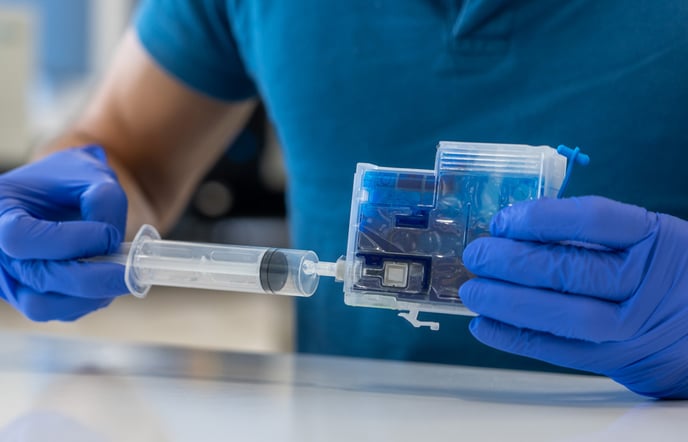 If the missing nozzles are from one channel only and the rest are in a good condition, make a cycle of: Head Cleaning – Nozzle Check - Head Cleaning – Nozzle Check. If the issue is still visible, start by changing the cartridge(s) that the respective channel(s) are missing and fill it with fresh ink. When changing a cartridge, make sure that you fill the filter with ink by pulling the ink out with a syringe from its bottom. Perform an Initial Charge via RIP and check the Nozzle test. Make sure that the inks you are using have not expired, as they may cause ink flow issues.
STEP 5. Get professional help
If the issue insists, please reach out to a qualified technician or your local dealer for help. You can also come in touch with our support team, by filling out the following form:
To get a more accurate and prompter response, please include the following in your issue report:
- Nozzle test picture
- Capping station picture with wiper out
- Printhead bottom surface
- Ink batch numbers
Warning: Don’t try anything that can put your machine at risk, as you may cause further damage and invalidate your printer’s warranty.