-1.png?height=120&name=Polyprint%20Logo%20(Dark)-1.png)
Learn how to choose and use properly the two spray area selection modes, Linear and Grid; and how to select the desired liquid quantity. Benefit from the custom presets and the production feature.
Spray area selection
Always starting from the Home screen, you just need to tap on the shirt icon in order to enter the edit modes. The “Grid” and the “Linear” edit are seen on the main bar.
'Grid' edit mode
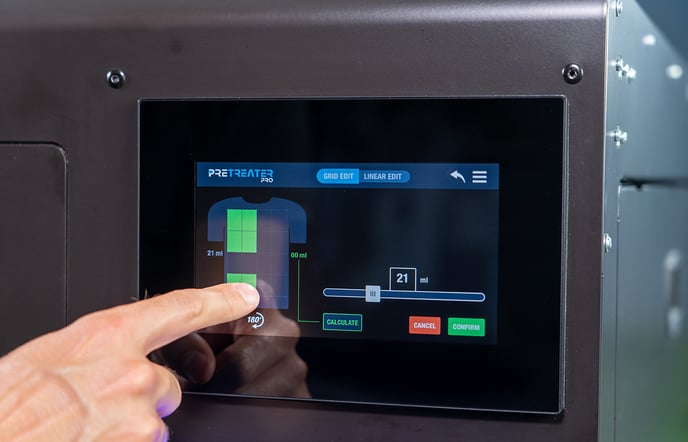 Being on the Grid edit mode you get the full area of 41x60 cm (16.1"x23.6"), divided according to a grid-based mode into 16 blocks (10x5 cm / 3.9"x1.9") each. Selecting and de-selecting the blocks it’s fairly easy, the only thing you have to do is to tap on each block. This way you have the chance to select more than one non-consecutive area.
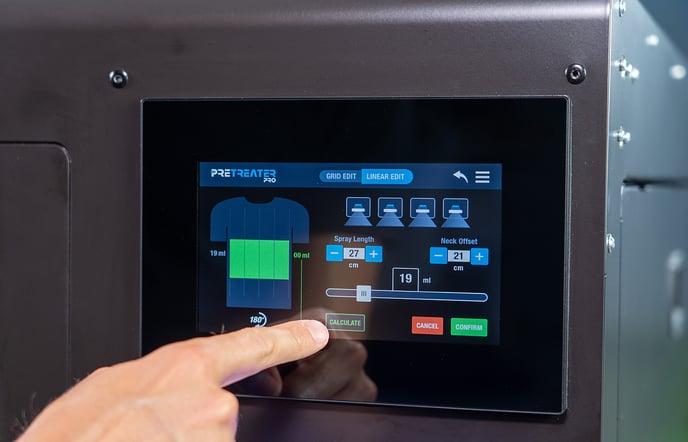
'Linear' edit mode
 In order to achieve a more precise area selection, since the minimum area is 10x1 cm (3.9"x0.4"), you can choose the Linear edit mode. By selecting/deselecting the nozzles and by adapting the spray length, you can even achieve the minimum area of 1 cm (0.4 in)! This mode apart from precision offers you also the advantage of less liquid waste.
Note: One thing you need to notice, before selecting the exact spraying areas, is the orientation of the shirt, so as to match, the way you have placed the shirt, onto the platen. With the 180 degrees button you can change the orientation of the shirt anytime.
Liquid quantity
You can specify the liquid quantity, in ml, with the use of the Slider bar. Be aware, to always select the suggested amount of pretreatment liquid, according to the type of garment you wish to print upon.
 When you select an exact amount of liquid; this number reflects the amount of a full 41x60 cm (16.1"x23.6") spray & it is also displayed on the left side of the depicted t-shirt. In order to find the exact liquid quantity for the particular selected area, you need to tap on the Calculate button.
Once Spray Area & Liquid Quantity Area are selected, you tap Confirm, to move on. Now you are transferred to the Home screen with your selected settings in display. You can either spray it right away by activating the Spray Toggle button or by pressing the Start button, placed on the bottom right of the machine.
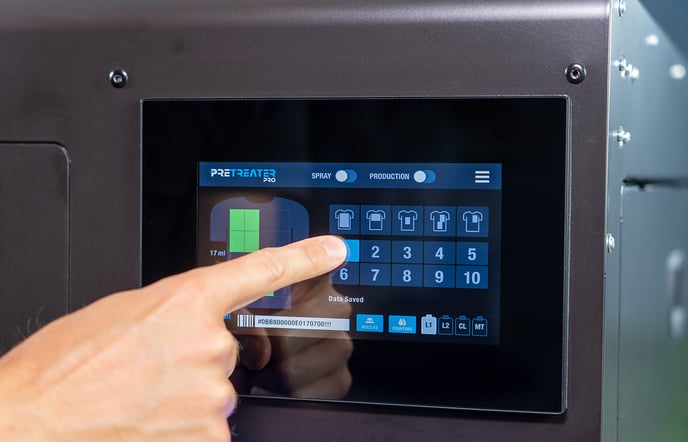 Another alternative, is to save this, as a custom preset, in one of the ten available slots. For example, if you want to save it in the number one slot, press it and hold it for 3 seconds and your data is saved. Now in the custom presets, by pressing number one, your data is saved.
Tip: When you have a large production and you are set on the Spray Area and Liquid Quantity; you can take advantage of the Production Toggle button. By activating it, you save time from pressing the spray button again and again, every time you load a shirt onto the platform, as the minute you close the drawer the spraying will start.