-1.png?height=120&name=Polyprint%20Logo%20(Dark)-1.png)
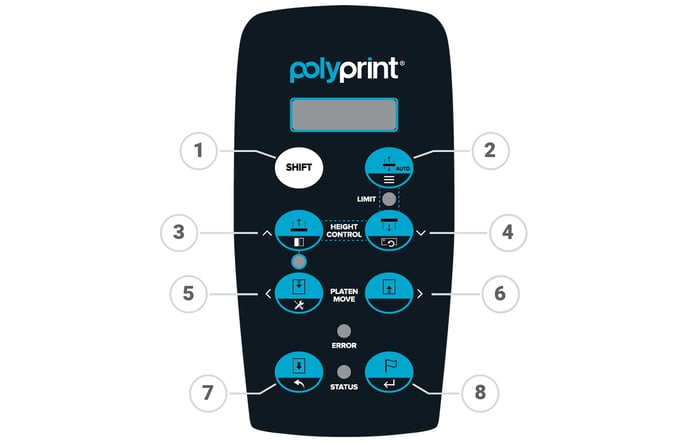
An introductory guide for the platen control panel of TexJet echo2 printer. Get to know all the buttons’ functions and their alternative options.
Main buttons functions
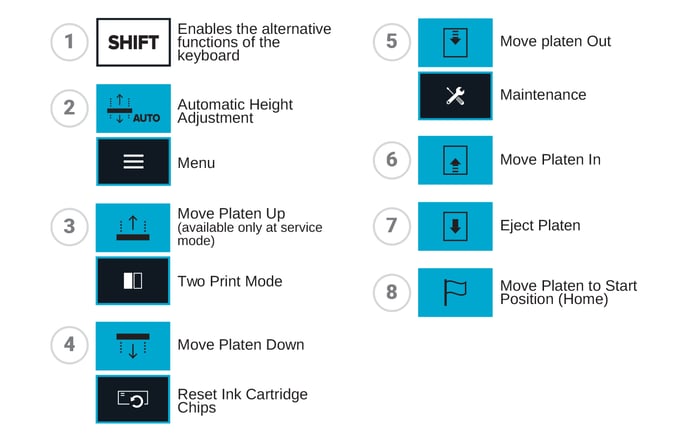
Eject button
It pulls out the platen all the way out.
It also works as a Cancel button, in case you regret an action performed that will move the table. By pushing it one time after you selected a platen move action, the platen stops.
Start Position button or Home button
It moves the platen to the start position, back inside the printer, where the printing procedure can take place. The panel’s screen reads READY TO PRINT. This button has the same function as the white LED button.
Out button
It pulls out the platen only at the point you want to. Press it continuously until it reaches the desired spot and then release it.
In button
It moves the platen back inside the printer. It works similar with the out button. It pushes in the platen only at the point you want to. Press it continuously until it reaches the desired spot and then release it.
Note: In button can not move the platen up to printing position. To send the platen there, press either the Start Position button or the Blue button.
Up button
Works only in Service Mode. To raise the platen use the Auto button which is described below.
Down button
It moves the platen down, meaning increasing the platen’s distance from the printhead. Useful when you want to avoid contact with the printhead’s bottom (e.g. thicker garments).
Auto button
It automatically adjusts the platen’s height at a safe distance from the printhead. After the adjustment, it ejects the table at its limit. Below the button there is a red led that indicates when the garment is at the marginal distance from the printhead.
Auto height adjustment feature on TexJet echo2 & why it is important
Shift button
Enables the alternative functions of the keyboard.
White LED button
It moves the platen to the start position, back inside the printer, where the printing procedure can take place. The panel’s screen reads READY TO PRINT. This button has the same function as the Start Position or Home button.
Tip: Pressing the Eject button immediately after executing any Main button function, will cancel that function.
Alternative buttons functions
To enable the alternate button functions you need to first press the Shift button and then whichever button you want to use according to the list below.
Shift + Auto buttons
Gives you entrance to the Menu, where you can navigate using the panel’s button as in the case of a keyboard.
Pressing the Up Button alone you select the above option.
Pressing the Down Button alone you select the below option.
Pressing the Out Button alone you select the left option.
Pressing the In Button alone you select the right option.
Pressing the Eject Button alone works like the common "Back" button, transferring you to the previous page.
Pressing the Start Position Button alone works like the common "Enter" button.
Shift + Up buttons
Enables the Two Print mode feature. This way the platen moves back inside on its own after the first printing job and begins the second. Useful in case of dark garments when first you print the white underbase and afterwards the CMYK layer. A time saving move that alerts you that is in operation with the LED below the Up button. To turn this feature off, press again Shift + Up.
Shift + Out buttons
Gives you access into maintenance routine. The panel’s screen reads PLEASE PERFORM A HEAD CLEANING OR EJECT TO ABORT. If you want to proceed on running maintenance, follow the instructions or if you want to abort push the Eject button.
TexJet echo2: Daily & weekend maintenance guide
Shift + Down buttons
Allows you to reset the ink cartridges’ chips, when the printhead’s panel indicates to do so.
Cartridge chip reset on TexJet echo2
LEDs explanation
Status
When the printer is on stand-by mode the LED remains turned-on and when the printer is operating it blinks.
Error
When an error occurs in the printer or when the environmental conditions are not suitable then this LED turns on and makes noise.
Auto button LED
Below the Auto button there is a LED that turns red when the platen reaches a distance that is considered unsafe for printing (too close to the printhead). To turn it off, push the Down button until the right height is achieved.
Up button LED
When LED button is on, it indicates that the Two Print mode is in operation. To turn it off, push the Shift and after the Up button.