-1.png?height=120&name=Polyprint%20Logo%20(Dark)-1.png)
A guide on how to knock out selected areas of an image or clear the whole background by using Fluid mask, a build-in color removal tool, which is available in Polyprint’s RIP software.
Digital Factory Apparel Polyprint Edition is a RIP software which includes numerous options and capabilities, through accessible tools and settings that each of them provides the user with a variety of alternatives. This way the printing outcome is exactly as the one the user had in mind, while the printing procedure becomes easier and at the same time superb print quality is achieved.
Color removal tools are powerful tools that allow the user to remove precise areas or even the whole background of an image. Such a case could be a person standing in front of scenery, which could save the user from printing unnecessary colors that are incorporated in the design or are quite similar to the substrate’s color. Fluid Mask is a feature included in Polyprint’s software. It allows you to select areas with fine details and colors close to the background. It automatically clears the image by knocking out the selected sections.
In order successfully use the Fluid Mask tool, easily follow the detailed steps below:
Step 1
Upload the file that you want to print, in the desired queue tab. Right-click in the image and select the Edit with Fluid Mask option.
Available print queue tabs on Digital Factory Apparel Polyprint Edition v10
Step 2
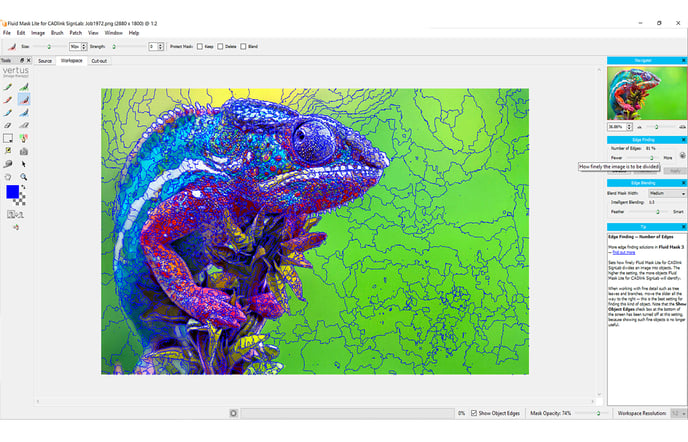 In the window that opened, you will notice that your image is now divided in sectors depending on the color gamut. In the right side, two slide bars are visible named Edge Finding and Edge Blending respectively.
Edge Finding sets how Fluid Mask divides an image into sectors. The higher the setting, the more sectors will appear. When working with fine details, move the slider all the way to the right (More) in order the number of separated areas to be increased.
Edge Blending offers two methods for blending the edges along the cut-out border: Feather, which allows simple, even transition across the edge ignoring the character of the edge. Smart, uses the characteristics of color and texture variations around and across an edge.
Note: Smart blending typically produces higher quality results. However, if an edge has low contrast or a lot of noise (extreme color and texture variations), the edge produced may be uneven. In such circumstances, Feather blending should be used.
Step 3
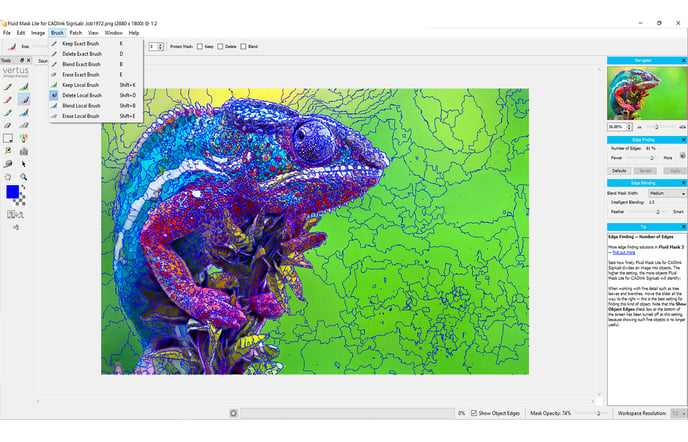 In the left side of the window, 3 brush options are available:
Keep Local Brush fills the sections that you wish to remain in the final cut-out.
Delete Local Brush fills the sections that you want removed from the final cut-out.
Blend Local Brush fills the sections that will be blended in the final cut-out. Blend Mask lies between those areas you want to keep and those you wish to delete, resulting in a gradual removal.
Notes:
- The Brush Size changes the brush size. The brush cursor is displayed at the center of your image, while you adjust the size slider so that you can see, exactly, how large your brush will be.
- The Brush Strength determines how far your brush stroke will grow. A Strength of greater than zero may flood-fill into other sectors, similar in color and texture. The greater the strength, the less similar a sector has to be for it to be filled.
Step 4
Tap on Images and select Auto-Fill with Keep option, in order for the sectors that you want to keep and therefore print to be selected automatically, after of course you have used the Delete Local Brush tool.
Step 5
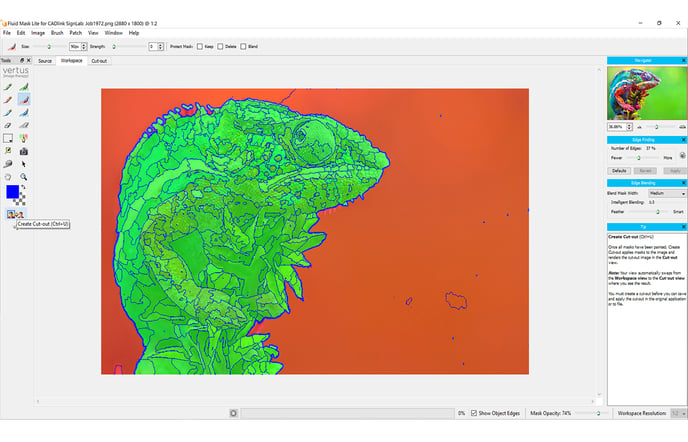 When finished formatting your image, select the Create Cut-out option, located on the left toolbar, which will apply all your changes to the image and your view automatically will swap from the Workspace view to the Cut-out view, where you will see the final result.
Step 6
Tap on File and select the Save and apply option in order for the new edited image to be saved and appear on your selected queue tab.