-1.png?height=120&name=Polyprint%20Logo%20(Dark)-1.png)
All you need to know about this special white underbase tool that Polyprint’s RIP software offers you. Learn everything regarding its use: purpose, available settings and compatibility with print modes.
Digital Factory Apparel Polyprint edition, is a RIP software equipped with various tools that allow the user to make his own adjustments, in order to customize his designs and achieve unique prints of exceptional quality. Among the numerous settings that the software provides, the white underbase tools are those that stand out the most, as they can -depending on your preferences, transform the final outcome, of the opacity of the white underbase layer.
When printing on dark-colored garments, the highlight white feature can be quite effective, as you can boost the white ink’s opacity in specific areas of the print. For instance, when printing an image that has both white and colored areas and you want to boost the opacity only on the white areas of the design and not on the entire underbase, this is when highlight white comes in handy. The printhead will lay an extra layer of white ink, simultaneously with the CMYK layer, only on the areas that will remain white on the final outcome and not be overlapped with the colors. By using this feature, you save on white ink as you print the extra quantity only on exact areas of the print and not on the whole underbase layer as in the case of Quality mode or in other settings like Choke etc.
For access to the highlight white options and to adjust them according to your preferences, follow the steps described below:
Step 1
After you upload your file in the desired print queue, double-click on it and a window named “Job Ticket Properties” will pop-up.
Note: If you want your highlight white adjustments to be applied on all the files you upload in a print queue, then double-click on the desired queue in order to save the settings you will make.
Step 2
Tap at the Color Layer option and a drop-down list will appear. Then, select Processing Options.
Step 3
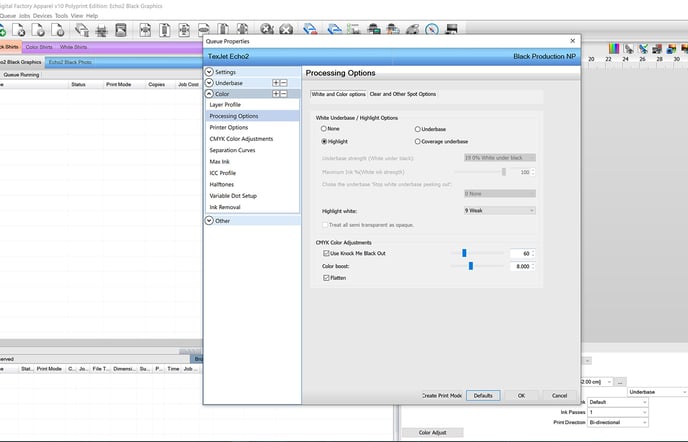
At the White Underbase/ Highlight Options, make sure the Highlight option is selected. At the Highlight white, select the corresponding number to the desired opacity, depending on how Weak, Medium or Strong you want the result.
Step 4
Press OK to save your adjustments.
The highlight white feature is available on the Production, Quality, Speed and Speed Vivid modes on both the Color and Black shirt print queues.
Available print modes on Digital Factory Apparel Polyprint Edition v10
Available print queue tabs on Digital Factory Apparel Polyprint Edition v10