-1.png?height=120&name=Polyprint%20Logo%20(Dark)-1.png)
A step-by-step process on how to safely discharge the system from ink and leave the printer with cleaner in the ink flow route.
Texjet shortee2 in case of long-time idleness or transportation needs to be charged with cleaner solution in its ink flow system, so any unwanted clogging to be prevented. The Cleaner Charge process can also be used when the user wants to load another brand of inks to his printer, but for maintenance purposes as well. When the time comes and the user wants to print again, he has to perform the Ink Charge process so the ink system is purged from cleaner and filled with fresh ink.
The Cleaner Charge and the Ink Charge are the same in means of equipment and are executed via the Digital Factory Apparel v10 Polyprint Edition RIP software. The main difference is that you use cleaner solution instead of ink and basically a very powerful printhead cleaning is performed, as the system is drained from ink.
Make sure that you follow the steps below, so the ink flow route can be safely discharged from ink:
Cleaner Charge
STEP 1
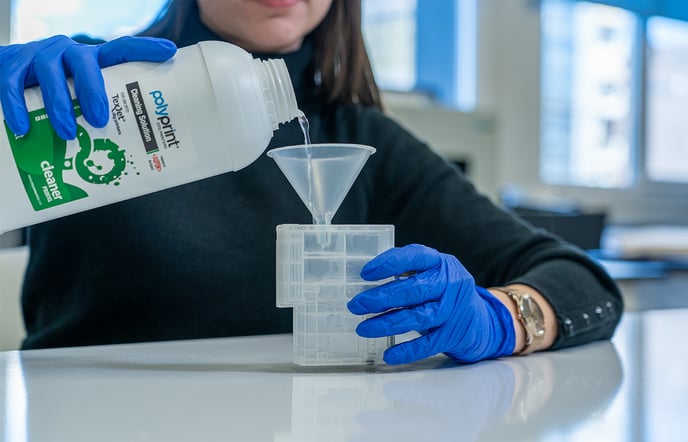 Use a brand new set of nine (9) refillable cartridges and fill them with cleaner solution. It is highly recommended to use the same brand as the inks that are installed in the printer.
STEP 2
Remove the ink cartridges from the printer’s ink system and place the cartridges that contain the cleaner liquid.
STEP 3
Power on the printer as usual, following the instructions on the Platen Control Panel.
STEP 4
Connect your printer via USB to your PC or laptop. Open the Digital Factory Apparel v10 Polyprint Edition RIP software.
STEP 4
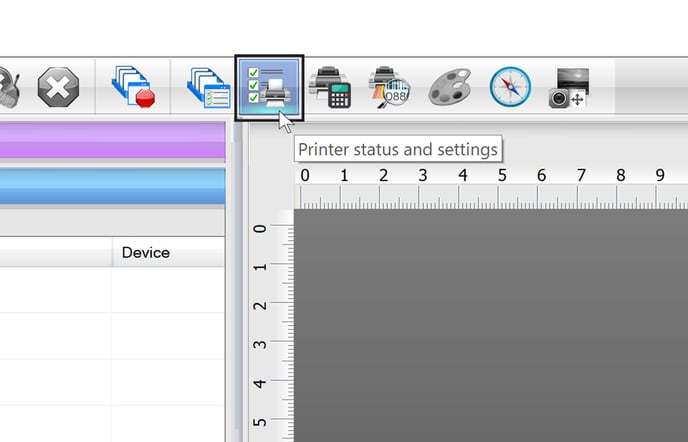 Go to the icons toolbar and select Printer Status and settings.
STEP 5
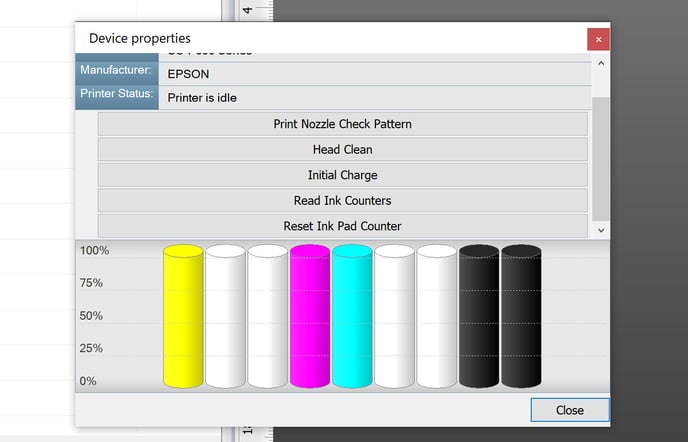 Click on the Initial Charge to start the Ink Charge procedure.
Caution: Be careful! The charge takes about 10 minutes, so do not turn off or unplug TexJet shortee2 while the ink charge is running.
Note: If after the cleaner charge, a message that reads “Ink Pad Reset” is displayed on the Printhead Control Panel, follow the guide to remove it.
STEP 6
Repeat Step 5. In contrast with the ink charge, the cleaner charge must performed at least 2 times, so the ink flow route is absolutely clean from ink residue.
Note: After each cleaner charge empty the waste bottle. Reset it if necessary.
STEP 7
After the cleaner charges are completed, the ink flow route should be looking empty from ink and the tube coloring faded. Perform a nozzle test and check that all channels are printed almost transparent. If you can still see some color its better to perform one Head Cleaning from the Printhead Control Panel.
Note: If you plan on transporting or storage your printer you must perform the standard maintenance process after the Cleaner Charge. This way, all ink flow parts will be clean from ink residue and there will be no risk of clogging.