-1.png?height=120&name=Polyprint%20Logo%20(Dark)-1.png)
A detailed guide on facing print quality issues. A process that will help you achieve high quality dtg prints consistently.
Before printer Wake-up
Environmental conditions
The optimal environmental conditions for operating a dtg workstation are around 20 °C (68 F) and 55% relative humidity. Check the conditions of your workspace. If they are way above or below that mark, they may be the reason you are experiencing ink flow issues that result in poor quality prints.
Tip: If you have trouble keeping your workspace’s environmental conditions stable, a humidifier or dehumidifier can come in handy.
Pretreatment agitation
Pretreatment solutions are polymeric emulsions, meaning that the solid ingredients are solubilized in water. Those solids – because of their high density, have a high tendency of precipitation. In order to obtain a high quality print with a strong white underbase, it is vital that these liquids are kept homogeneous. If not mixed regularly, then you are probably spraying your garments with an unwanted percentage of water, resulting in faded prints and poor wash resistance.
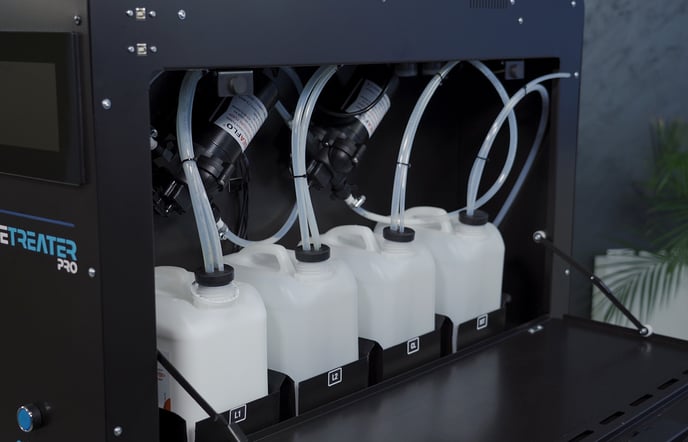 To overcome such an issue, always remember to shake the pretreatment tanks or bottles before loading them in your pretreatment machine or hand sprayer. If you want to exclude such a variable and achieve consistency in your results, you can opt for an automatic pretreatment machine, such as PreTreater Pro that automatically recirculates the solutions without requiring manual handling.
Ink agitation
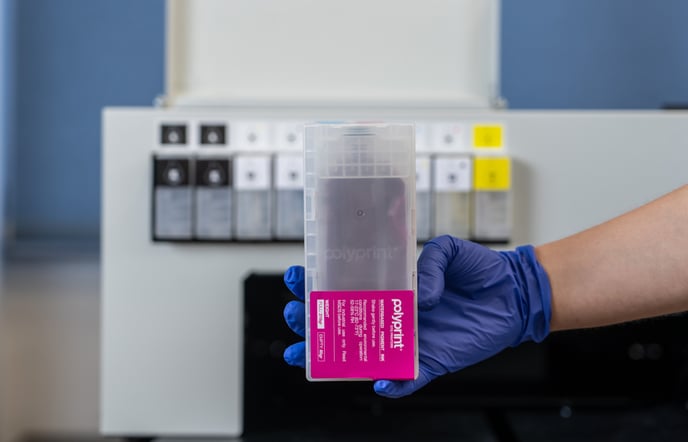 The inks used in dtg are water-based pigments, meaning that the color is in particle form and dispersed in water. Those finely ground particles can precipitate or even agglomerate. For this reason, prior waking up the printer, agitate the ink cartridges in order to redisperse the pigment and keep the mixture homogeneous. This is particularly visible in the white ink, as its formulation requires more maintenance than the other colors.
Note: Make sure that you frequently check that the inks and pretreatment liquids you are using haven’t expired. Learn how to store and maintain inks & pretreatment liquids
Printer Wake-up
Perform at least one Head Cleaning to remove the ink that has settled in the ink flow route during the idle time. If you have left the printer idle for more than five days, then you can perform a Heavy Head Cleaning from the start. Check that the colors in the nozzle test are vibrant, especially the white ink, and if there are a lot of missing nozzles. If looking faded or nozzles are missing, perform another Head Cleaning and check the nozzle test again.
TexJet echo2: Wake up procedure
Caution: Make sure you empty and reset your maintenance cartridge before performing a Heavy Head Cleaning.
Before Printing
Fabric quality
One of the most important parameters for dtg printing is the quality of the garment you choose to print on. Dtg is not suitable for every fabric in the market and works better on premium weaves. Even if you have perfected your pretreatment process and your printer is in excellent condition, when you decide to print on lower quality fabrics the result will also be of poor quality. Dtg printing performs best at natural fibers and especially ring-spun cotton.
Pretreatment application
 The amount of pretreatment applied to a garment can not only affect the print quality but also its wash fastness. If you apply too little pretreatment then, the white underbase will turn out faded. If you apply too much, the print may look vibrant with excellent density, but when washed it has a high chance of cracking and peeling off. To overcome such issues, you can experiment by measuring the t-shirt, after spraying it, to make sure it’s within the suggested ml range. This is especially vital when using a hand sprayer gun – where you can’t control the quantity, instead of an automatic pretreatment machine.
Garment placement & Auto height adjustment
Place your garment on the printer’s platen and make the proper adjustments to flatten out the garment’s surface. Use the adjustable frame system or apply fabric glue to the platen, in order to make sure that the garment will not move during printing. Perform an Auto Height Adjustment. This is very important, because if the printhead is spraying from a big height, the sharpness of the print will be minimized and details of the design may even disappear. Additionally, the ink mist created will land on a machine’s part causing future problems and therefore be a cause for frequent maintenance.
Curing process
Equipment check
The print’s fixation is one of the major factors that can cause issues on the final outcome. First of all, you should make sure that your curing equipment, either it’s a heatpress or an oven, operates properly and its not placed in an area subjected to rapid temperature changes (i.e. open window). Check that prior to curing your garment the temperature of the equipment is stable and doesn’t drop or rises dramatically within seconds.
Curing steps
Light-colored garments. Sometimes, you can experience a yellow stain on these garments. To avoid this, you can lower the temperature or the pressure on your heatpress.
 Dark-colored garments. Those garments require a white underbase, which is the trickiest to cure properly as it may crack during fixation and lose opacity. A simple way to stop this from happening is to leave your garments air-dry for a while before proceeding with curing. By doing this, you let excess humidity (from the water in the inks) evaporate and help the pigments settle in better in the fabric’s weaving. After some time, which depends mainly on the dimensions of the print and the percentage of the white ink printed, you can proceed on curing safely the print without risking white ink splattering on top of CMYK inks and cracking.
Note: Cure your prints according to the recommended fixation parameters for the specific ink set that you are using. If you under-cure or overcure your prints you may experience poor washability.
Printer Shutdown
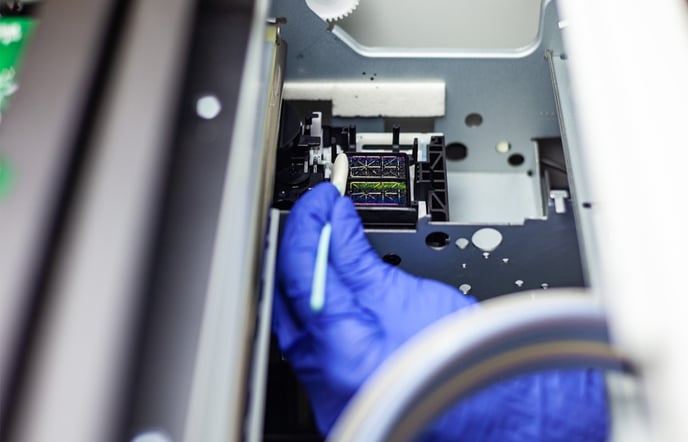 Ensure that you perform, correctly, everyday the maintenance routine. Clean the capping station and wiper thoroughly with cleaner. If you experience poor sharpness the Scale CR of Carriage Shaft maybe need cleaning. Make sure you maintenance them properly every month.
Note: Over time, the printhead’s bottom can gather fibers and dried ink. Inspect it daily and once you notice something, carefully clean its surroundings with a swab. Don’t touch the mirror surface, because you may cause permanent nozzle loss.